
What to Do If Your Bone Graft Is Falling Out?
Is My Dental Bone Graft Falling Off?
Quick Answer: If you notice small, white, sand-like granules in your mouth during the first two weeks after surgery, your bone graft is likely experiencing normal surface shedding rather than failing. This minor particle loss is a predictable part of the healing process as the overlying gum tissue seals the surgical site. However, if you see large chunks, notice a dry exposed membrane, or experience worsening pain and foul odors, you should contact your oral surgeon immediately.
For the full recovery overview, including what is normal after a dental bone graft, warning signs, white material, healing stages, and implant timing, see our complete Dental Bone Graft Guide.
Now, let’s discuss the details; What to do if your Bone Graft is Falling Out.
You went to check the surgical site, spotted something white and grainy, and immediately reached for your phone. That gritty, sand-like material in your mouth after a dental bone graft is alarming to see, and the instinct to search for answers is completely understandable. If you’re wondering what to do if your dental bone graft is falling off, here’s the short answer: in the first one to two weeks after surgery, some particle shedding is expected. It’s part of how these materials are designed to work.
That said, “usually normal” doesn’t tell you what to do right now. This article gives you a clear framework grounded in peer-reviewed dental research, not forum speculation. You’ll know what that material actually is, how to tell normal shedding from a genuine complication, and exactly when to call your surgeon. Here at The Calm Dentist, written by dental clinicians and researchers, the goal is straightforward answers you can act on.
What that white granular material actually is
The biology of a dental bone graft
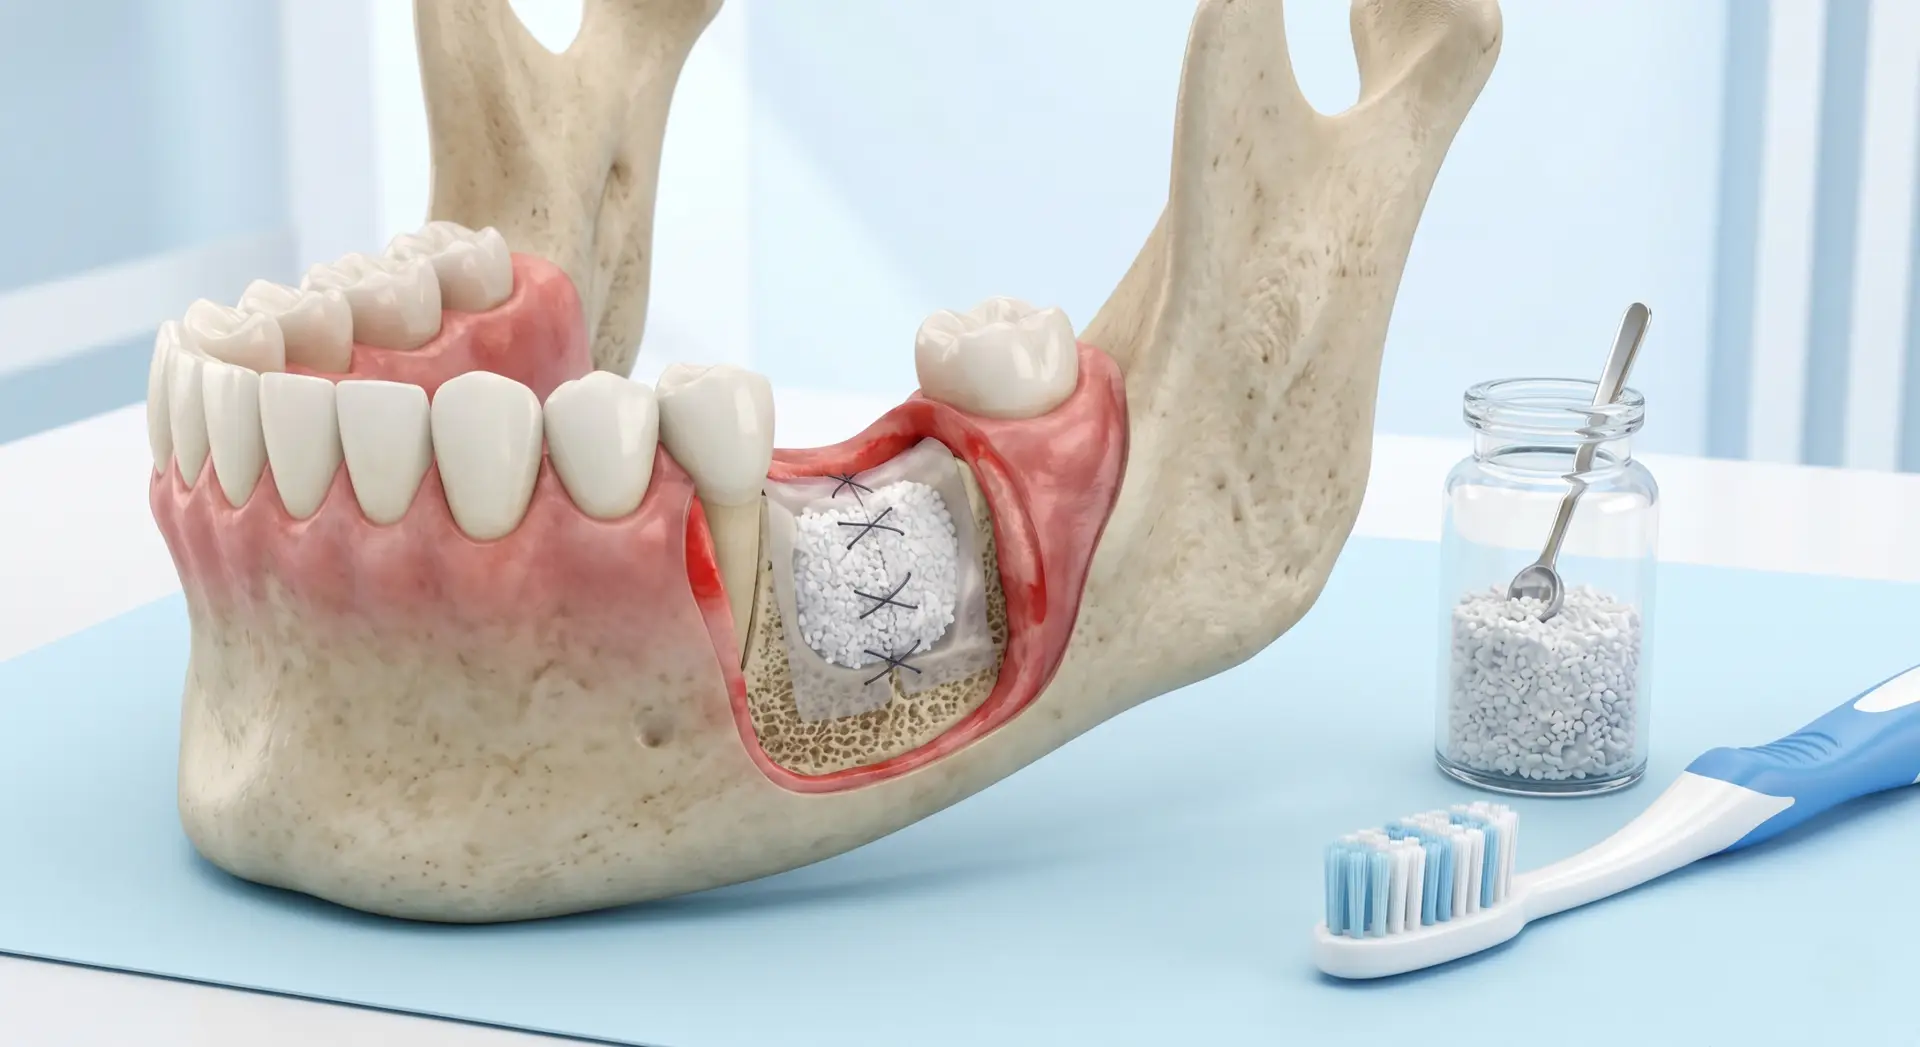
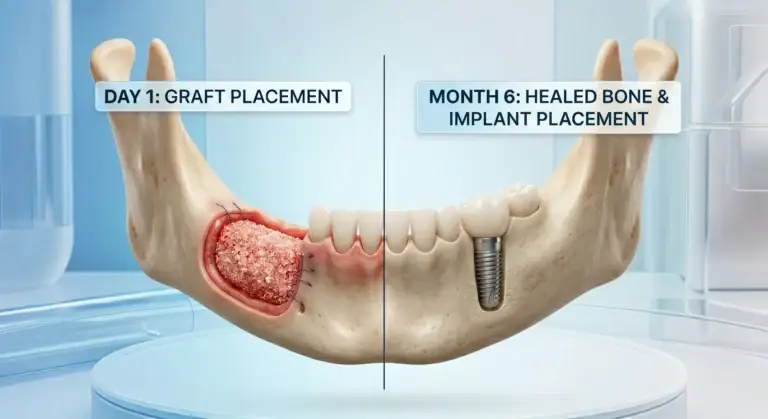
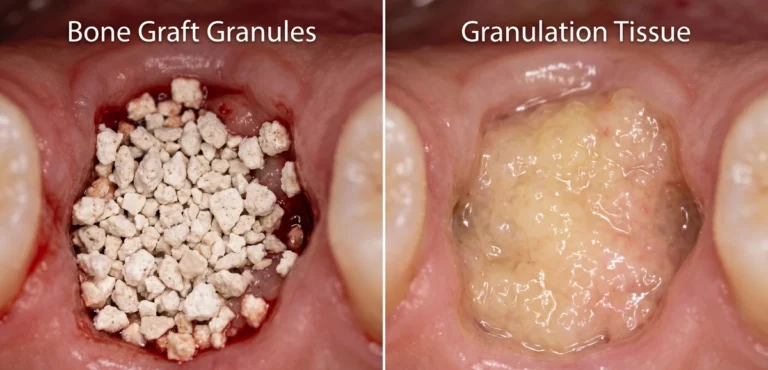
Bone graft material isn’t a solid piece that fuses like a puzzle piece into your jaw. It’s a particulate scaffold, typically made from synthetic hydroxyapatite, processed donor bone (allograft), or bovine-derived xenograft, designed to provide a temporary structure that your body replaces with natural bone over months. These granules look white, off-white, or tan, and have a texture patients consistently describe as coarse salt or fine sand.
The graft’s job is to hold space and stimulate bone growth, not to stay intact as one piece. It gradually integrates and resorbs as your own alveolar bone forms in its place. The material you see is not a structural component that has “fallen off” the way a filling or crown might.
Why particles sometimes work their way out
In the first one to two weeks after surgery, the overlying gum tissue is still healing and sealing over the site. During days three through ten especially, minor openings in the surgical site can allow surface-level granules to migrate out. This is particularly common when sutures haven’t fully closed the wound yet.
Surface-level particle shedding is clinically distinct from graft failure. The granules you’re seeing are the topmost layer of material, not the deeper scaffold supporting bone formation. The scaffolding that matters remains beneath the surface doing its job, provided the site is otherwise healing normally.
What normal graft material looks like vs. what should concern you
Normal particle shedding looks like tiny white or off-white grains, similar in size and texture to coarse salt. There’s no strong odor, minimal or no bleeding beyond the first couple of days, and the surrounding tissue is pink and progressing toward closure.
What should put you on alert is a different picture entirely: large chunks of material coming out rather than fine grains, tissue that looks greyish or soft instead of pink, a persistent foul taste or odor, or a membrane that appears dry and exposed rather than covered by healing tissue. These are not normal shedding signs; they’re signals to call your surgeon.

Normal particle shedding vs. true graft failure: how to tell the difference
What the healing timeline actually looks like
Understanding the expected recovery sequence helps you place what you’re seeing in the right context. The first three days are typically the most intense: swelling peaks, a clot forms at the site, and if a membrane was placed during surgery as part of guided bone regeneration, it will be present during this early phase. From days four through ten, soft tissue begins closing and small granules may appear at the surface.
This is the window most patients find themselves searching for answers about what to do when a dental bone graft seems to be falling off, and it’s also the window where shedding is most expected. By weeks two through six, the graft integrates with surrounding bone and soft tissue should be closing smoothly. Full bone remodeling takes three to six months.
The specific differences between normal shedding and graft failure
Normal shedding presents with a small amount of gritty material, improving pain levels each day, swelling that is decreasing rather than increasing, no fever, and gum tissue visibly trying to close. The trajectory is consistently improving, not worsening.
True graft failure looks different: pain worsening after day three or four rather than improving, swelling that returns after initially going down, a visible exposed area that looks dry and white rather than covered by tissue, and often a foul taste or smell. A specific complication called dehiscence, where gum tissue pulls back from the surgical site and exposes the graft below, is distinct from normal particle loss and requires clinical attention.
Why this distinction matters for how you respond
Calling your surgeon because a few grains appeared on day five is a very different situation than calling on day twelve because there is a visible open area with an odor. The more precisely you can describe what you’re seeing, the faster your surgical team can triage your call and give you accurate guidance. Knowing which scenario you’re in is what determines the urgency of your next step.
What to do if your dental bone graft is falling off: immediate steps
What to do in the first 24 to 48 hours
Start with a gentle saltwater rinse: dissolve a quarter teaspoon of salt in eight ounces of warm water and let it fall passively from your mouth rather than spitting with force. Do this two to three times daily. Eat only soft foods and chew exclusively on the side opposite the graft site. Take any prescribed antibiotics or anti-inflammatory medications exactly as directed and complete the full course, even if you feel better before it ends.
If possible, take a photo of the area and note roughly how much material came out, labeling it as a clinician-recommended step rather than a formally studied protocol. This removes guesswork when you speak with your surgeon and helps them triage your situation accurately from the start.
What to avoid entirely
- Do not probe the area with your tongue, finger, or any object. Mechanical disturbance at this stage can dislodge deeper scaffold material.
- Do not rinse forcefully, spit with pressure, or use a straw. The suction and pressure created pulls against the clot and graft material.
- Do not smoke. Smoking constricts blood supply to the healing site and is one of the most reliable ways to turn a minor complication into a significant one.
- Do not assume the graft is ruined. One call to your oral surgeon will give you far more useful information than an hour on symptom-checker sites.
Red-flag symptoms that mean you should call your surgeon
Signs that warrant a next-morning call
Pain that is increasing after day three or four, even with prescribed medication, should prompt a call to your surgeon’s office the next morning. So should swelling that returns after previously subsiding, or swelling that hasn’t reduced at all by day five to seven. A persistent bad taste or odor from the site often signals early bacterial activity before more obvious infection signs develop, and it’s worth reporting. A membrane that looks dry, exposed, or discolored, grayish or dark rather than pink, also belongs in the “call tomorrow” category.
Signs of infection that require same-day evaluation
Any fever accompanied by worsening oral pain or discharge from the site is a same-day situation, not a monitoring situation. Pus or thick yellow-green discharge from the surgical area needs prompt clinical evaluation. Swelling that extends to the jaw, cheek, or neck indicates the infection may be spreading beyond the local site, which is a medical urgency requiring same-day care. Difficulty swallowing or opening your mouth fully are red-flag symptoms that need same-day clinical assessment regardless of anything else you’re experiencing.
What to tell your surgeon when you call
Give them the timing (how many days since surgery), a description of what the material looked like and roughly how much you saw, your current pain level on a scale of one to ten, and whether you have any fever, odor, or change in swelling pattern. Specific, detailed information helps your surgical team respond with the right level of urgency and avoids delays caused by back-and-forth follow-up questions.
Signs your bone graft might be failing
While minor shedding is normal, there are specific signs that suggest the graft is not healing as it should. You should keep a close eye on the area for the following:
- Persistent or worsening pain: It is normal to feel sore for 3 to 5 days. However, if the pain gets worse after the first week or feels like a deep throb, it could be a sign of trouble.
- Excessive swelling: Swelling usually peaks after 48 hours and then goes down. If your face continues to swell after day four, contact your dentist.
- A bad taste or smell: This often indicates a bone graft infection. You might also notice yellow or green discharge (pus) around the gums.
- The membrane is visible: Often, a “shield” called a membrane is placed over the bone. If this moves or falls out entirely, the bone underneath is no longer protected.
- Large chunks falling out: If you lose a significant piece of the graft rather than just a few grains, the site may lose the volume needed for an implant.
What your oral surgeon will likely do
Conservative management for minor particle loss or early membrane exposure
For small dehiscence or minor particle shedding without signs of infection, most surgeons take a watchful approach. Based on established clinical protocols, this typically involves close monitoring, a prescription chlorhexidine rinse to reduce bacterial load at the site, and continuation of any antibiotic course already underway. Evidence and guidance on antibiotic choices are discussed in reviews of prophylactic antibiotic use in implant dentistry.
No further surgical intervention is needed in many cases, and the graft continues to integrate below the surface even while surface tissue heals. Losing some surface granules does not mean the entire graft needs to be redone, this is the most common presentation, and the outcome is frequently favorable.
More involved interventions when exposure is significant
When a membrane is exposed and at risk, one evidence-supported approach uses L-PRF (leukocyte-platelet-rich fibrin), with support from published case reports and series. The surgeon draws the patient’s own blood, concentrates the platelets and growth factors through centrifugation, and applies the resulting fibrin matrix to the wound across two to three sessions to stimulate tissue closure. It’s worth noting that evidence for this approach comes primarily from case-based data rather than large randomized trials.
Studies including a widely cited systematic review on guided bone regeneration report that membrane exposure occurs in roughly 30% of GBR procedures, yet overall success rates remain above 90% when the complication is managed appropriately. In cases of true graft failure with significant bone loss, debridement and partial or full re-grafting may be necessary. This is the least common outcome, and when addressed early, salvage rates are meaningful.
Realistic expectations for outcomes
Reaching out to your surgeon at the first sign of a concerning change improves the likelihood of salvaging the graft compared to waiting and hoping the situation resolves on its own. Most grafts that experience minor complications do still go on to support successful implant placement. The goal of calling early is not to brace for bad news; it’s to maximize the chances that your graft works.
Immediate steps to take
If you suspect something is wrong, follow these steps to keep the area safe until you can see a professional:
- Don’t touch it: It is tempting to poke the area with your tongue or finger to see what’s happening. Do not do this. You could introduce bacteria or dislodge even more material.
- Stop rinsing forcefully: If you were told to use a salt-water rinse, do it very gently. Let the water “bathe” the area and then let it drool out of your mouth into the sink. Do not spit.
- Check for bleeding: A little pink saliva is fine. If you have bright red, active bleeding, bite down gently on a clean piece of gauze for 20 minutes.
- Call your dental clinic: Explain your symptoms clearly. Tell them if you see bone graft material coming out or if you have a fever.
Protecting the graft from here: aftercare that actually makes a difference
The dietary and activity restrictions with the biggest impact
Maintain a soft food diet for at least two weeks, ideally extending to four to six weeks if your graft covered a large defect. The mechanical forces generated by chewing on the graft side can physically disrupt the scaffold before it integrates with surrounding bone. Avoid alcohol for at least the first week, as it impairs circulation and compromises clot stability in much the same way smoking does. Hold off on strenuous exercise for the first three to five days; elevated blood pressure from physical exertion increases bleeding risk and can disturb the clot at a critical point in healing.
Oral hygiene practices that support healing without disrupting the site
Continue brushing your other teeth normally, but keep the brush away from the surgical site for at least two weeks unless your surgeon instructs otherwise. Use your prescribed rinse or a gentle saltwater rinse consistently; bacterial control during the soft tissue healing window is one of the most important variables in graft success. Attend every follow-up appointment, even when you feel fine. The one-week and two-week checks are specifically designed to catch early dehiscence before it becomes a larger, harder-to-manage problem.
If your dental bone graft is coming loose, knowing what’s normal is how recovery starts
Seeing granular material in the first week after a bone graft is common, and in most cases, it’s not a sign the graft has failed. It’s a predictable part of how these scaffold materials behave during soft tissue healing. What matters is the full picture: what the material looked like, how much came out, and what else is happening at the site.
The framework is straightforward. Small white grains with no other symptoms call for gentle aftercare, careful monitoring, and patience. Pain that’s increasing, fever, discharge, or expanding swelling call for a same-day conversation with your surgeon rather than a wait-and-see approach. When in doubt, call. One short phone conversation with your surgical team is always the right move.
The Calm Dentist exists to be the resource you land on instead of one that sends you spiraling. Every article here is written by dental clinicians and researchers with one goal: calm, accurate answers you can actually use. If a new symptom appears during your recovery, the post-surgical guides here are a good place to start; trusted patient-facing summaries such as WebMD’s overview of gum tissue graft surgery can also be helpful, then follow up with your surgeon for anything that concerns you. Knowing the difference between what’s normal and what isn’t is the most practical step you can take toward a successful recovery.
Dr. Mehmood Asghar is a Dentist and an Assistant Professor of Dental Materials, with nearly a decade of clinical experience. He holds a Ph.D. in Dental Biomaterials from Universiti Malaya and a Bachelor of Dental Surgery (BDS) from NUST. As a dedicated researcher with over 25 peer-reviewed publications and more than 310 citations in international journals, Dr. Asghar bridges the gap between clinical dentistry and advanced biomaterials research to provide patients with evidence-based, practical dental advice.
4 Comments