
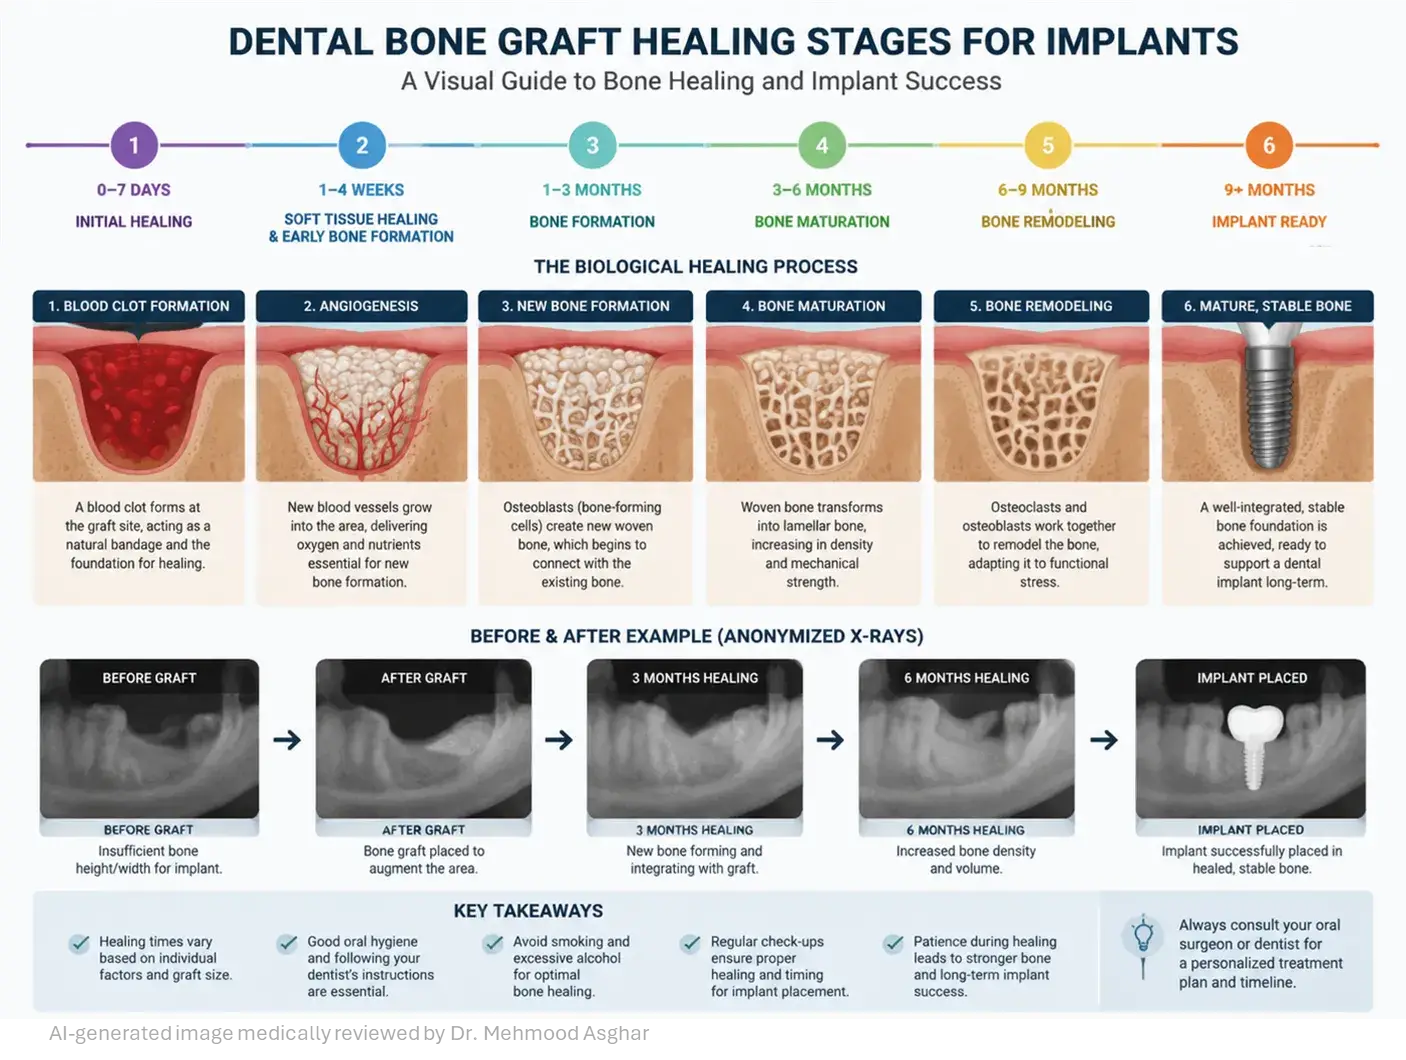
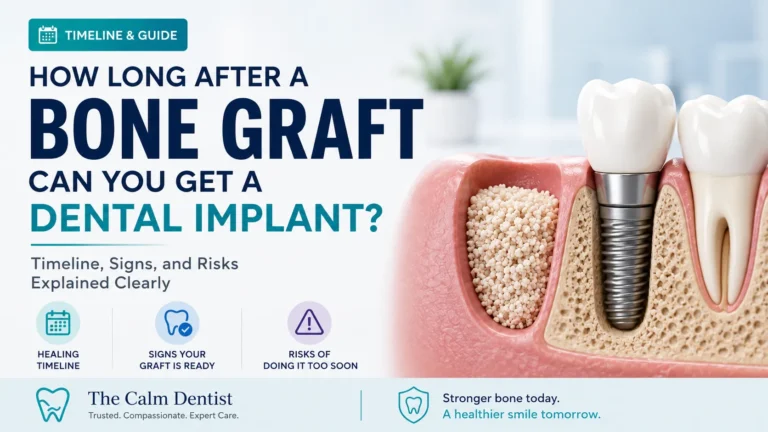
Quick Answer: Dental bone graft healing stages typically progress from clot formation in the first 1–3 days, soft tissue closure during week 1, new bone formation over months 1–3, and bone maturation by months 3–6. Most patients are ready for implant placement after 3–6 months if healing is normal.
Introduction: Why the Dental Bone Graft Healing Stages Timeline Matters
If you are planning to get a dental implant, a bone graft is often the vital first step. According to the University of Michigan, over 2.2 million bone graft procedures are performed worldwide. Many patients require this procedure because the jawbone has thinned after tooth loss or due to long-term gum disease. Without enough “ground” to sit in, an implant cannot stay secure.
While the surgery itself is relatively quick, the dental bone graft healing timeline is a biological marathon, not a sprint. It requires patience and a bit of “TLC.” Understanding what happens from day 1 to month 6 will help you spot any issues early and ensure your new bone grows strong.
For a broader overview of dental bone graft recovery, normal symptoms, warning signs, white material, graft particles, sinus lift, and implant timing, read our complete Dental Bone Graft Guide.
Phase 1: The Immediate Post-Op (Hours 1 to 24)
The first 24 hours are arguably the most important for the “survival” of the bone graft. When you leave the dental chair, the graft material is at its most vulnerable.
The Formation of the Fibrin Clot
As soon as the surgeon finishes, your body begins a process called hemostasis. This is the formation of a blood clot. In a bone graft, this clot acts as a biological “glue” that holds the graft granules in place and provides a matrix for new cells to move into.
- Protect the Site: You must avoid any activity that creates a vacuum in the mouth. This includes using straws, smoking, or heavy spitting. If the clot is dislodged, the graft material can leak out.
- Bleeding Management: It is normal to see pink-tinged saliva or slight oozing. Use the sterile gauze provided by your dentist, biting down firmly for 30-minute increments.
- The “No-Rinse” Rule: Do not use mouthwash or salt water on Day 1. You want the surgical site to remain completely undisturbed.
Managing Initial Discomfort
As the local anesthetic wears off, you will feel a dull ache. Your dentist may prescribe any over-the-counter pain medication or anti-inflammatory medicine. Taking your first dose before the numbness completely fades is a professional tip for staying ahead of the pain.
Phase 2: The First Week (Days 2 to 7)
This is the “inflammatory phase.” Your immune system is sending a massive amount of white blood cells to the area to prevent infection and begin cleaning up cellular debris.
Swelling, Bruising, and Peak Discomfort
Expect the swelling to get worse before it gets better. Usually, Day 3 is the peak of facial puffiness.
- Cold Therapy: For the first 48 hours, use an ice pack on the outside of your cheek. Apply it for 15 minutes on, 15 minutes off.
- Transition to Heat: After Day 3, if you still have swelling, switch to a warm compress. This helps improve blood circulation, which flushes out inflammatory fluids.
- Bruising: Some patients develop a yellow or purple tint on the skin near the jawline. This is normal and will fade within a week.
Oral Hygiene Protocols
By Day 2, you need to keep your mouth clean to prevent bacteria from attacking the graft.
- Warm Salt Water Rinses: Mix half a teaspoon of salt in a glass of warm water. Gently bathe the area by tilting your head—do not swish aggressively.
- Antiseptic Mouthwash: Your dentist might prescribe a Chlorhexidine rinse. Use this exactly as directed.
- Brushing: You can brush your other teeth as normal, but avoid the surgical site entirely for the first week.
Phase 3: The Transition Period (Weeks 2 to 4)
By now, the acute pain should be gone. This is where the “soft tissue” (your gums) finishes closing over the graft.
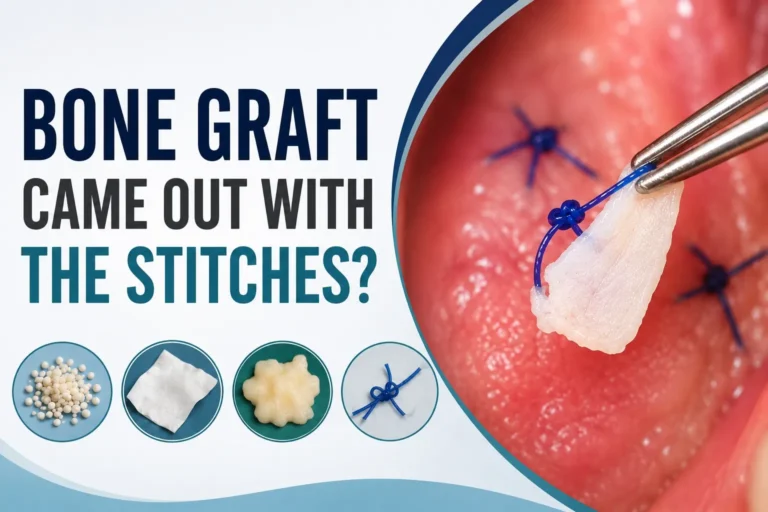
Stitch Removal and Gum Closure
Dental surgeons use either dissolvable or non-dissolvable sutures. If yours are non-dissolvable, you will return to the clinic around Day 10 to 14.
- The gums should look pink and healthy.
- The gap where the surgery happened should be mostly sealed.
- You might still feel a “tightness” in the area, which is the new tissue maturing.
The Role of Nutrition in Bone Healing
To support bone growth, your body needs specific building blocks.
- Calcium and Vitamin D: Essential for bone mineralisation.
- Protein: Collagen is the primary protein in bone; ensure you are getting enough lean protein to support tissue repair.
- Vitamin C: Helps with gum health and collagen synthesis.
- Foods to Avoid: Seeds, nuts, and popcorn. These can get lodged under the gum and cause an infection.
Phase 4: The Biological Deep-Dive (Months 2 to 3)
This is where the “quiet” magic happens. You won’t feel anything, but your jaw is undergoing a complex cellular renovation.
Angiogenesis: Growing the “Supply Lines”
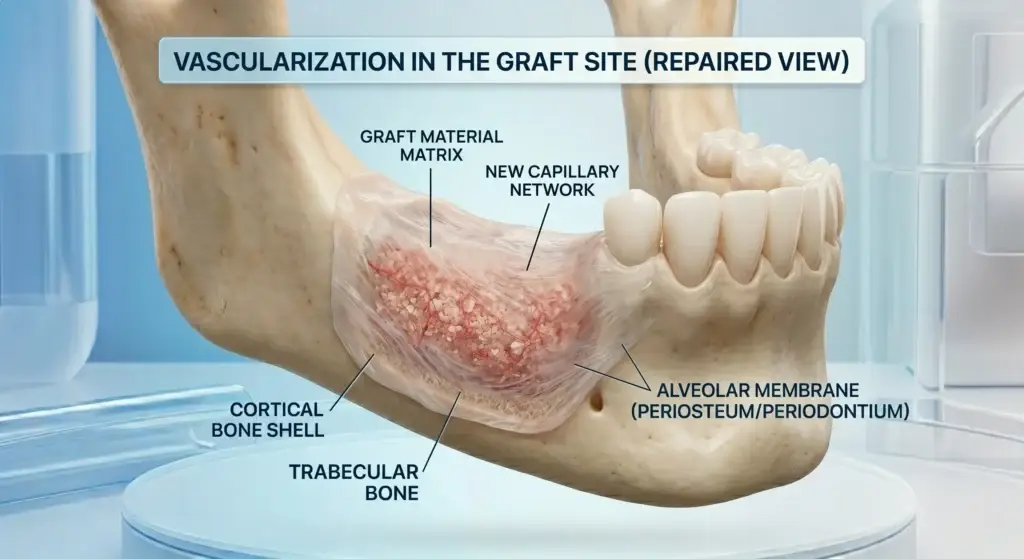
For bone to grow, it needs blood. During Month 2, a process called angiogenesis occurs. Tiny new capillaries (blood vessels) sprout and grow into the graft material. These vessels act as a delivery system, bringing the oxygen and minerals required to turn a “foreign” graft into “living” bone.
Osteoblasts and Osteoclasts: The Construction Crew
Your body uses two main types of cells during this phase:
- Osteoclasts: These cells “dissolve” the temporary graft material.
- Osteoblasts: Following right behind, these cells lay down new, organic bone matrix.
Phase 5: Maturation and Density (Months 4 to 6)
We are now in the home stretch. The goal of this phase is calcification.
Hardening the Foundation
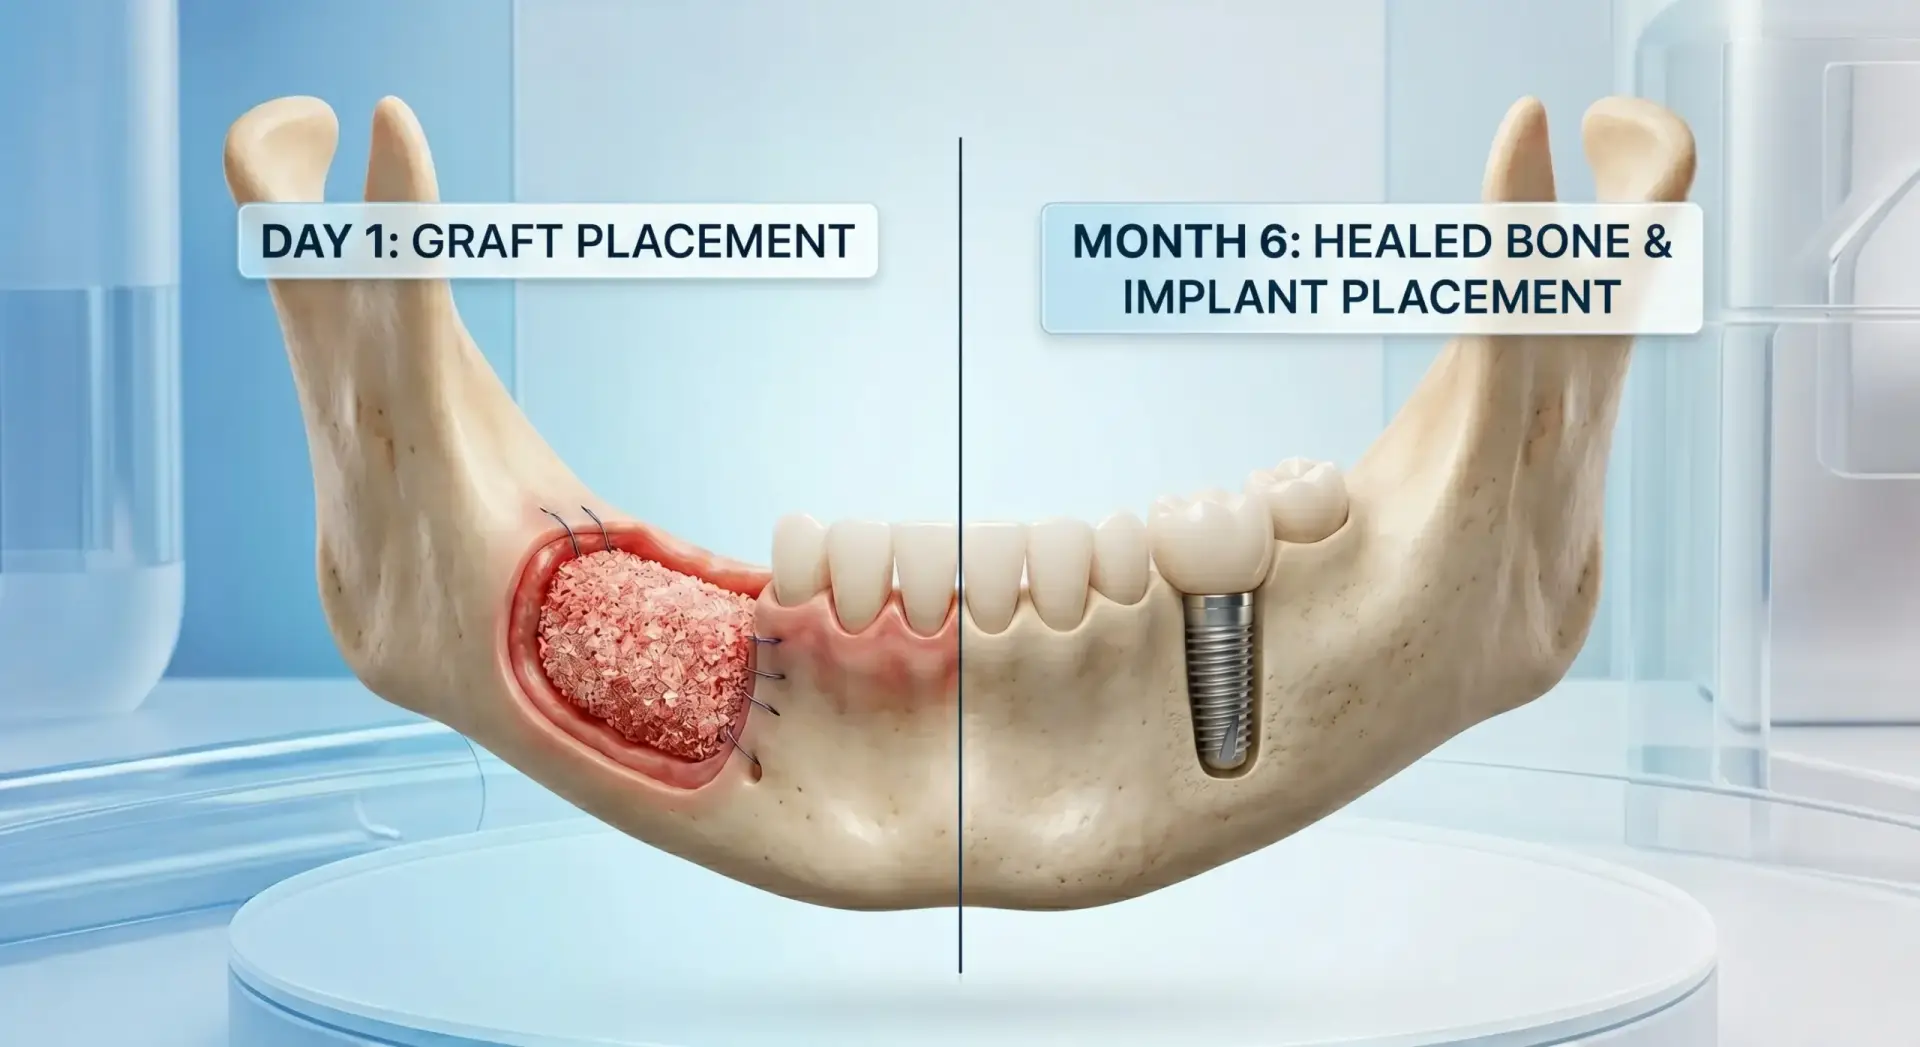
During months 4 through 6, the soft bone matrix begins to mineralize. It becomes hard, dense, and structurally sound. This is particularly important for the upper jaw, where the bone is naturally more “spongy” than the lower jaw.
The Final Assessment
Before your dentist schedules your implant surgery, they will perform a final assessment. This usually involves a CBCT scan. This 3D X-ray allows the dentist to check that the graft has fused perfectly with your original jawbone and ensure there are no soft spots.
Comprehensive Troubleshooting: What Could Go Wrong?
Dental bone grafts have a success rate of over 95% in healthy patients. A research study published in the Journal of Oral Implantology showed that bone grafts for tooth implants had a 100% success rate Despite this, it is important to know the signs of a dental bone graft falling out:
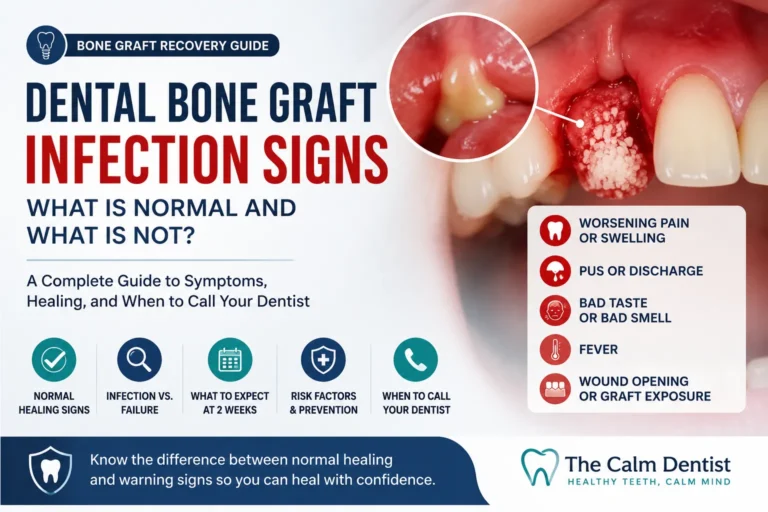
1. Infection (Graft Rejection)
If bacteria enter the site, an infection can occur.
- Symptoms: Increasing pain after Week 1, pus discharge, or a persistent fever.
- Action: Contact your dentist immediately. They may prescribe antibiotics to save the graft.
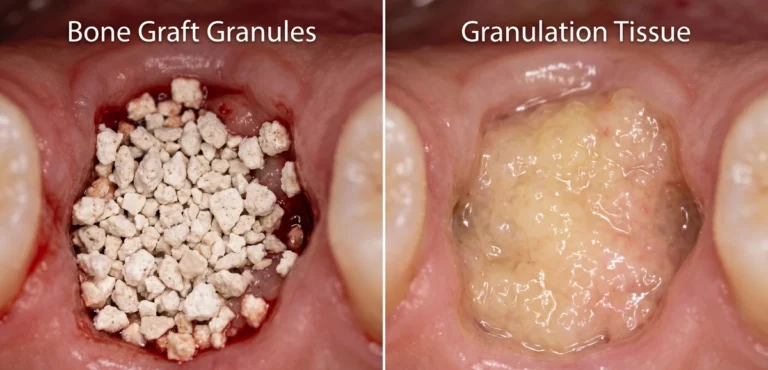
2. Sequestrum (Small Bone Fragments)
Occasionally, you might feel small, sand-like granules in your mouth. While a few granules in the first week are normal, if you feel sharp “shards” pushing through the gums a month later, it could be a piece of bone that didn’t integrate. Your dentist can easily remove these.
3. The Smoking Effect
Smoking is the leading cause of bone graft failure. Nicotine is a vasoconstrictor, meaning it shrinks your blood vessels. This starves the healing site of oxygen. Most dentists insist that patients quit smoking for at least 2 to 3 months to protect their investment.
Summary Table: Healing at a Glance
| Timeframe | What’s Happening? | Your Main Task |
| Day 1 | Blood clot formation. | Protect the site; No straws/smoking. |
| Days 2-4 | Peak swelling. | Ice packs and soft food diet. |
| Weeks 1-2 | Gum tissue closes. | Salt water rinses; Stitch removal. |
| Month 1 | New blood vessels grow. | Return to light exercise. |
| Months 2-3 | Bone remodelling. | Strict hygiene; Avoid smoking. |
| Months 4-6 | Bone hardens. | Final X-ray and implant planning. |
Final Thoughts for the Patient
The journey from Day 1 to 6 Months is about growing a new part of your body. By following your dentist’s aftercare instructions and maintaining a nutrient-rich diet, you ensure that your dental implant will have the strongest possible foundation.
When that 6-month mark finally arrives, you will be ready to complete your smile transformation.
Frequently Asked Questions (FAQ)
How painful is a dental bone graft healing process?
Most patients experience only a mild, dull ache and swelling that peaks around Day 3. This acute discomfort is normal and easily managed with over-the-counter anti-inflammatory medications. By the end of the first week, any significant pain should completely subside.
How do I know if my dental bone graft is healing properly?
Normal healing is marked by a gradual reduction in pain and swelling after Day 3, followed by gum tissue closing smoothly over the site by weeks 2 to 4. The absence of severe throbbing pain, pus, foul tastes, or heavy bleeding indicates a healthy recovery.
Is it normal for small granules to come out of the graft site?
Yes, it is very common to feel a few sand-like granules in your mouth during the first week as loose particles escape before the gums seal. However, if you notice large quantities dislodging or sharp shards poking through the gums weeks later, contact your dentist.
What are the main signs of a failed dental bone graft?
While failure is rare, you should contact your dentist immediately if you experience signs of infection, including:
- Severe, throbbing pain that worsens after the first week.
- Pus or a foul-tasting discharge coming from the surgical site.
- A persistent fever or chills.
Why do I have to wait 3 to 6 months before getting my dental implant?
Your jaw requires this time to grow new blood vessels and replace the temporary graft material with living bone. The final months are critical for calcification—hardening the new bone matrix so it is dense enough to permanently lock a titanium implant into place.
Can I speed up the bone graft healing process?
You cannot force biology, but you can optimize it. Support your recovery by consuming a soft-food diet rich in Calcium, Vitamin D, and protein, practicing gentle oral hygiene with warm salt water rinses, and strictly avoiding smoking, which starves the graft of essential oxygen.
Dr. Mehmood Asghar is a Dentist and an Assistant Professor of Dental Materials, with nearly a decade of clinical experience. He holds a Ph.D. in Dental Biomaterials from Universiti Malaya and a Bachelor of Dental Surgery (BDS) from NUST. As a dedicated researcher with over 25 peer-reviewed publications and more than 310 citations in international journals, Dr. Asghar bridges the gap between clinical dentistry and advanced biomaterials research to provide patients with evidence-based, practical dental advice.

3 Comments